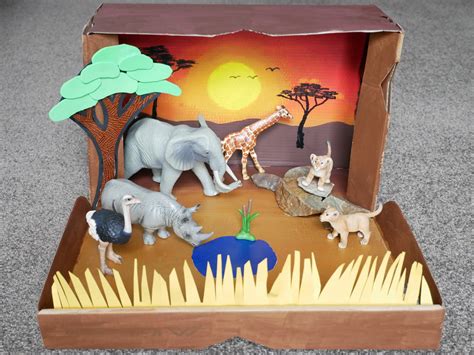
Welcome to your comprehensive guide on understanding and utilizing dioramas in an educational setting. A diorama is a three-dimensional scene, usually contained within a box or a shallow box-like structure, that simulates a particular setting or event. Dioramas are fantastic tools for enhancing students’ creativity, historical understanding, and storytelling abilities. They blend elements of art, geography, history, and science, making learning both interactive and enjoyable. This guide will help you create, use, and optimize dioramas in the classroom to maximize educational value.
Why Dioramas Matter in Education
Dioramas are more than just visual displays; they serve as a dynamic medium to engage students in the learning process. Through building and interacting with a diorama, students immerse themselves in a specific historical period, geographical location, or scientific concept. This hands-on approach fosters a deeper understanding and retention of the subject matter compared to traditional lectures and textbooks. Dioramas also encourage teamwork and collaborative problem-solving as students often work in groups to create their dioramas.
While dioramas offer a myriad of benefits, educators may face challenges such as time constraints, limited materials, or a lack of clear instructions on how to integrate dioramas into the curriculum. This guide addresses these challenges head-on, providing practical advice and actionable steps to maximize the educational value of dioramas.
Quick Reference
Quick Reference
- Immediate action item with clear benefit: Start small. Use basic materials like cardboard, glue, and craft supplies to create a simple diorama. The immediate benefit is increased student engagement and a tangible learning project.
- Essential tip with step-by-step guidance: Outline the project on the board. Provide step-by-step instructions on how to plan, build, and present the diorama to ensure clarity and organization.
- Common mistake to avoid with solution: Don’t rush the process. Allow sufficient time for planning and construction. This prevents last-minute stress and promotes thoughtful creativity.
Creating Your First Diorama: Step-by-Step Guidance
Creating a diorama can be a fulfilling and educational experience for students. Below is a detailed, step-by-step guide to help you and your students build a diorama that is both informative and visually appealing.
Step 1: Conceptualize Your Diorama
The first step in creating a diorama is to conceptualize your project. Decide on the theme or subject matter of the diorama. This could be a historical event, a scene from a story, or a geographical location. For instance, if your diorama is about ancient Egypt, think about what aspects you want to highlight: the pyramids, the Nile River, or daily life in ancient times.
Next, create a visual sketch of your diorama. This doesn’t have to be a detailed drawing, but it should give you a basic idea of the structure and elements you want to include. This step is crucial as it helps in visualizing the final product and planning the materials needed.
Step 2: Gather Materials
For a basic diorama, you’ll need some common materials that are easy to find. Here is a list of what you might need:
- Cardboard boxes (these will form the base of your diorama)
- Craft foam, poster board, or newspaper (for building the landscape and structures)
- Glue and adhesives (white glue, glue sticks, or contact paper)
- Paints and brushes (to add color and details)
- Figurines or small items to represent people, animals, or other characters
- Backdrop paper (optional, for a background scene)
Once you have gathered all the necessary materials, you’re ready to move on to the construction phase.
Step 3: Build the Base Structure
Start by cutting out the front and back panels of a cardboard box. These panels will create the illusion of depth when the diorama is viewed from the front. Place the box on a flat surface and secure the panels with tape.
Next, build the landscape and structures that will be part of your diorama. Depending on your theme, this might involve constructing mountains, buildings, or other scenery. Use craft foam, poster board, or even newspapers to create these elements. Adhere them to the front panel of the box using glue or adhesives. Be meticulous with your measurements to ensure everything fits well within the diorama.
Step 4: Add Details and Color
Once the basic structure is in place, it’s time to add details and color. Use paints and brushes to color the landscape and structures. Don’t forget to add smaller elements like trees, rocks, or grass to make the scene more realistic. Pay attention to details that will make your diorama visually appealing and true to the theme.
Step 5: Include Figurines and Prop Items
The final step is to include the figurines or small items that will represent people, animals, or other characters in your diorama. Place them in positions where they fit naturally within the scene. This step is where your diorama comes to life and starts telling the story you have envisioned.
Using Dioramas in the Classroom: Advanced Techniques
While the basic steps outlined above provide a strong foundation, there are more advanced techniques you can use to enhance the educational value of dioramas.
Firstly, consider integrating technology into your diorama project. For example, you can add a short video or a QR code that links to more information about the theme. This not only makes the diorama more interactive but also broadens students’ research skills.
Another advanced technique is to use historical or scientific data to design your diorama. Research and incorporate authentic details that will make your diorama not just a creative project but an educational tool. This helps in building students’ research skills and critical thinking abilities.
Lastly, consider having a showcase day where students present their dioramas to the class or even to a larger audience. This adds an element of public speaking and confidence-building to the project.
Practical FAQ
What common mistakes should I avoid when creating a diorama?
There are a few common mistakes to avoid when creating a diorama:
- Rushing the project: Take your time to plan and construct the diorama. This will lead to a more polished and thoughtful final product.
- Ignoring research: While creativity is important, make sure to do some research on the theme to ensure the diorama is accurate and educational.
- Overcomplicating the design: Keep it simple and focus on the key elements that tell the story of your diorama.
By avoiding these common pitfalls, you will create a more effective and enjoyable learning experience for both you and your students.
Dioramas are a versatile and powerful educational tool. When used thoughtfully and with careful planning, they can greatly enhance student engagement and learning. Whether you’re creating a simple diorama for a classroom project or an advanced, research-based diorama for a school showcase, the steps outlined in this guide will help you and your students achieve educational success.
Remember, the key to successful diorama creation lies in planning, research, and attention to detail. Use this guide as a roadmap to create dioramas that are not only visually stunning but also rich in educational value.