Phase contrast microscopy has revolutionized the way we observe transparent biological specimens. This powerful technique provides unparalleled clarity and contrast, making it an invaluable tool in both research and clinical settings. Whether you’re a student, researcher, or professional, understanding and utilizing phase contrast microscopy can significantly enhance your ability to examine live cells, tissue samples, and microorganisms with precision.
This guide aims to walk you through the essentials of phase contrast microscopy, offering step-by-step guidance and practical advice to ensure you get the most out of this sophisticated technique.
If you’ve ever struggled with making your transparent samples visible under the microscope or found traditional bright-field microscopy lacking, phase contrast microscopy is the solution you've been looking for. This guide will take you through the fundamental concepts, practical tips, and detailed procedures, ensuring you can confidently operate this microscope and achieve optimal results. Let’s dive in and explore the wonders of phase contrast microscopy.
Understanding Phase Contrast Microscopy
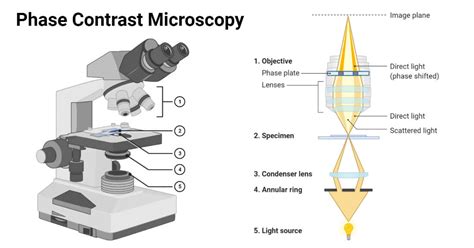
Phase contrast microscopy is an optical technique that enhances the contrast of transparent specimens by converting phase shifts in light waves into differences in brightness. Unlike bright-field microscopy, which can make it challenging to observe non-pigmented specimens, phase contrast microscopy allows for clearer visualization without staining. This is especially useful for observing live cells, where staining can alter their natural state.
The contrast in phase contrast microscopy is achieved by using a phase plate located in the back focal plane of the objective lens. This plate introduces a phase shift in the light waves, which then interferes with the light coming from the sample, thereby enhancing the visibility of fine details.
Problem-Solution Opening: Overcoming Microscopy Challenges
Many users face significant challenges when transitioning to advanced microscopy techniques, especially phase contrast microscopy. Common issues include difficulty in aligning the phase plate, adjusting focus, and achieving the best contrast settings. The goal of this guide is to address these challenges head-on with practical, actionable advice that will enable you to master phase contrast microscopy. By the end of this guide, you’ll understand how to set up, operate, and optimize your phase contrast microscope for the clearest possible images.
Whether you’re looking to analyze live cell cultures or detailed tissue samples, overcoming these initial hurdles will set the stage for more advanced applications and higher resolution imaging.
Quick Reference
- Immediate action item: Align the phase plate in the back focal plane of the objective lens for optimal phase contrast.
- Essential tip: Adjust the condenser aperture to enhance the contrast; keep it slightly under its maximum size for best results.
- Common mistake to avoid: Over-focusing, which can cause blurriness and reduce contrast; find the optimal focus by slowly adjusting the fine focus knob.
Setting Up Your Phase Contrast Microscope
Setting up a phase contrast microscope involves several critical steps to ensure that the phase plate and the rest of the optical system are correctly aligned. Proper alignment is crucial for achieving the best possible contrast and image clarity.
Here’s a detailed guide to help you set up your phase contrast microscope correctly:
Step-by-Step Guide to Setup
Follow these steps to set up your microscope:
-
Turn on the microscope and allow it to warm up for a few minutes. Warming up the light source ensures consistent illumination.
-
Place the phase plate in the back focal plane of the objective lens. This plate is usually supplied with the microscope and has a specific notch that aligns with a corresponding mark on the lens.
-
Adjust the light source to ensure that the illumination is uniform. The condenser should be focused correctly to project a bright field on the specimen stage.
-
Insert your sample on the microscope stage, and secure it with a cover slip if necessary. Ensure the sample is centered under the objective lens.
-
Start with a low magnification objective lens, such as 10x, to easily locate your sample and adjust focus.
-
Adjust the condenser to optimize the illumination. If your microscope has an adjustable condenser, use the iris diaphragm to achieve a sharp, bright field.
-
Gradually increase magnification if necessary, and make fine adjustments to the focus knob. Remember, phase contrast works best at higher magnifications.
These steps will help you get started and ensure that your microscope is ready for detailed phase contrast imaging. For more advanced setups or troubleshooting, always refer to your microscope’s user manual.
Optimizing Phase Contrast Microscopy
Optimizing your phase contrast microscope involves fine-tuning several components to achieve the highest possible image quality. Here’s how to ensure your setup is optimized:
Detailed Optimization Techniques
To get the best results from your phase contrast microscope, follow these advanced tips:
-
Focus adjustment: Find the optimal focus by slowly adjusting the fine focus knob until you achieve the clearest possible image. Over-focusing can blur details, so find the sweet spot where maximum clarity is achieved.
-
Condenser aperture: Experiment with different sizes of the condenser aperture. A slightly undersized aperture often provides better contrast. As you increase the size of the aperture, you will notice a loss of contrast, so keep it just slightly under its maximum size.
-
Phase ring: If your objective lens has a phase ring, adjust it until the best contrast is achieved. The phase ring alters the path difference between light waves, so precise adjustment is key.
-
Sample preparation: Use high-quality, clean slides and coverslips to avoid any impurities that could affect image clarity. Proper staining techniques (if used) can enhance contrast without compromising the live nature of the sample.
-
Environmental factors: Ensure that the microscope is in a stable environment with minimal vibrations. Use a vibration-isolation table if necessary to prevent any disruptions in your imaging.
Following these optimization techniques will significantly enhance your ability to observe detailed structures in your samples, whether they are biological cells, microorganisms, or intricate tissue sections.
What if my sample is not visible under phase contrast microscopy?
If your sample is not visible under phase contrast microscopy, consider the following steps:
- Check that the phase plate is correctly aligned in the back focal plane of your objective lens.
- Ensure the condenser aperture is appropriately set. A slightly undersized aperture usually provides the best contrast.
- Verify that your sample is thin enough to produce visible phase shifts. Thicker samples may require different techniques, such as using differential interference contrast (DIC) microscopy.
- If possible, adjust the phase ring to optimize the contrast settings for your sample.
- Lastly, check the focus. Fine adjustments may reveal details that are not immediately apparent.
If all these steps are correctly followed and your sample is still not visible, you might need to explore alternative microscopy techniques or consult with a specialist.
Advanced Techniques in Phase Contrast Microscopy
Once you have mastered the basics, you can explore advanced techniques that push the boundaries of what phase contrast microscopy can achieve. These techniques are geared toward researchers and professionals looking to extract even more detailed information from their samples.
Advanced Application Examples
Here are some advanced applications and examples of how phase contrast microscopy can be used:
-
Live cell imaging: Phase contrast is ideal for observing live cells without staining. This is crucial for studying dynamic processes such as cell division, movement, and interactions. For example, researchers use phase contrast microscopy to study cancer cell migration.
-
Microorganism observation: Phase contrast microscopy can clearly reveal the structure of microorganisms like bacteria, fungi, and protozoa. For instance, it can be used to study the morphology of various bacteria in