Creating a snowflake at home can be an enchanting and educational activity for both children and adults alike. Crafting your very own snowflake can serve as an excellent project for a winter holiday, a classroom activity, or even a fun family project. This guide will take you through a detailed, step-by-step process to create your very own snowflake, with practical examples and tips to ensure success. Whether you're new to crafting or a seasoned DIY enthusiast, this guide has something for everyone.
Why Make a Snowflake?
Snowflakes are unique in their intricate symmetry and beauty. Making a snowflake can teach you about symmetry, geometry, and the natural world. It’s a fun and relaxing activity that you can enjoy alone or with friends and family. Plus, it’s an environmentally friendly project that uses few materials. You’ll also have a beautiful piece of art to display, which makes the effort worthwhile.
Quick Reference
Quick Reference
- Immediate action item: Gather materials including a snowflake template, colored paper, glue, and scissors.
- Essential tip: Start by cutting out a circle from a piece of colored paper to form the center of your snowflake.
- Common mistake to avoid: Don’t cut out your final shape too early. Always trace and cut the design carefully to ensure accuracy.
How to Create Your First Snowflake
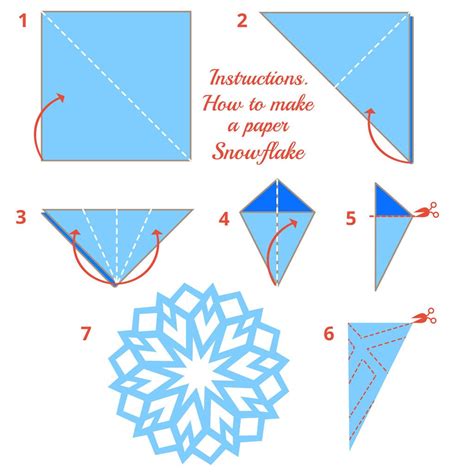
Making a snowflake starts with a template. Here, we’ll use a simple six-pointed star design. This basic guide will walk you through each step, ensuring you create a symmetrical and beautiful snowflake.
Step 1: Begin by gathering your materials.
- A snowflake template
- Colored paper (preferably thin, like construction paper)
- Scissors
- Glue
- A ruler
You can find a free snowflake template online or print one from various DIY websites. If you prefer, you can create your own template using a compass or by drawing a six-pointed star on graph paper.
Step 2: Start by drawing the center of your snowflake.
Cut a circle out of your colored paper. The size of the circle will determine the size of your snowflake. A good starting size is about 2 inches in diameter.
Step 3: Divide your circle into six equal parts.
Use a ruler to draw six radii that fan out from the center of the circle, ensuring each radius is the same length. These lines will guide where to cut along the star template.
Step 4: Trace your snowflake template.
Lay your snowflake template over the circle you’ve drawn. Carefully trace around the star design onto the paper. Make sure the points of the star are aligned with the radii you drew.
Step 5: Cut out the snowflake.
Using your scissors, carefully cut along the traced lines to form your snowflake. Start by cutting the outer points, then work inwards, avoiding cutting through the entire circle to keep the center intact.
Step 6: Create the symmetry.
The beauty of a snowflake comes from its symmetry. To ensure your snowflake looks symmetrical, carefully measure and cut each part with precision. Use the ruler to double-check your cuts and make any necessary adjustments.
Step 7: Add decorative touches.
Once you’ve created your basic snowflake, you can enhance it with glitter, colored markers, or stickers. Allow any glue to dry completely before handling the snowflake.
Step 8: Display your masterpiece.
Find a spot to display your beautifully crafted snowflake. You can hang it on the wall or place it in a window to let the light play through its intricate design.
Advanced Snowflake Techniques
Once you’ve mastered the basic design, it’s time to elevate your snowflake making to the next level with more complex designs and additional techniques.
Creating a Snowflake with More Points
Adding more points to your snowflake will make it more intricate and detailed.
Step 1: Start with a larger circle.
Use a larger circle, say 3 inches in diameter, as the center of your snowflake.
Step 2: Draw more radii.
Divide your circle into 12 equal parts. This will create a snowflake with a 12-pointed star.
Step 3: Trace and cut your template.
Lay a 12-pointed star template over your circle, trace it carefully, and cut it out following the same steps as before.
Using Different Shapes
While stars are the most common design for snowflakes, you can use other shapes as well.
Step 1: Choose your shape.
Select a shape such as a hexagon or octagon as the center of your snowflake.
Step 2: Draw your shape and lines.
Draw the chosen shape and divide it into equal parts, ensuring each section is the same.
Step 3: Trace and cut your design.
Use your selected shape as a template and carefully trace and cut it from your colored paper.
Practical FAQ
How can I make my snowflake look more detailed?
To add more detail to your snowflake, consider using finer and more precise cutting tools. A pair of sharp scissors or even a small craft knife can help you create cleaner and more intricate cuts. Additionally, using multiple layers of paper and cutting smaller sections within the larger design can add complexity and depth. Adding tiny embellishments like glitter, paint, or fine details with a marker can also enhance the visual appeal of your snowflake.
What materials can I use for my snowflake?
You can use a variety of materials to make your snowflake. Standard construction paper works well, but you can also experiment with other types of paper like origami paper, tissue paper, or even decorative paper with interesting patterns. Thinner paper will give your snowflake more translucency and can create a beautiful effect when light shines through it. Remember, using different types of paper can change the look and feel of your snowflake, so choose based on your preference and the effect you want to achieve.
Can I make a snowflake without a template?
Absolutely! While a template can make the process easier, you can certainly freehand your design. Begin by drawing a simple six-pointed star, or any symmetrical shape you like, in the center of your paper. Use a ruler to ensure that your lines are straight and your points are evenly spaced. Don’t worry if it’s not perfect—snowflakes made without templates often have a unique and charming irregularity that contributes to their beauty.
Tips and Best Practices
To ensure your snowflake-making process is smooth and successful, here are some additional tips and best practices:
- Precise Measurements: Use a ruler for all your lines and cuts to ensure symmetry.
- Sharp Tools: Use sharp scissors and, if needed, a small craft knife for precise cuts.
- Double-Check: Always double-check your cuts to avoid mistakes and ensure your snowflake maintains its symmetry.
- Experiment: Don’t be afraid to try different shapes and embellishments to make your snowflake unique.
- Display Options: Consider framing your snowflake for a polished look or displaying it on a string to d