Are you struggling to understand the Lewis structure for H2O (water)? Many students and professionals find this concept challenging but fear not! This guide will simplify it step-by-step, providing actionable advice and practical solutions that will make this topic understandable. We’ll dive straight into the problem-solving aspect, focusing on user pain points and delivering tips, best practices, and how-to information in an accessible conversational tone.
If you’re like many who have found the Lewis structure of water intimidating, you’re not alone. Understanding the Lewis structure of H2O is crucial for grasping more advanced chemistry concepts like molecular geometry, polarity, and chemical bonding. Here’s a comprehensive guide to demystify this topic, with real-world examples and practical solutions to common questions.
Step-by-Step Guidance to Mastering H2O Lewis Structure
Let’s break down the Lewis structure of H2O into manageable steps. This approach will cover everything from basic principles to advanced nuances, ensuring you get a thorough understanding.
Understanding the Basics
The Lewis structure represents how atoms bond together and the lone pairs of electrons that may exist in a molecule. To begin, you need to know the number of valence electrons each atom brings to the table. Oxygen has 6 valence electrons, and each hydrogen has 1. This means that in H2O, you start with a total of 8 valence electrons.
Step 1: Draw the Basic Skeleton
Start by drawing the skeletal structure of the molecule. Since oxygen is more electronegative than hydrogen, it will be the central atom:
- O – H
- H
Now, place the oxygen atom in the center with two hydrogen atoms attached to it.
Step 2: Distribute the Valence Electrons
Next, distribute the valence electrons. Start with the 8 valence electrons and place them around the atoms:
- First, give each hydrogen atom a single electron to complete its valence shell.
- This uses up 2 electrons.
- You are now left with 6 electrons to place around the oxygen atom.
Distribute these 6 electrons in pairs around the oxygen atom to represent lone pairs.
Step 3: Complete the Octet Rule
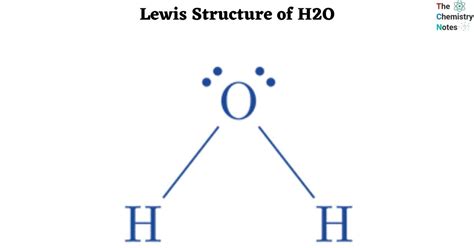
Oxygen needs 8 electrons to complete its octet. You’ve placed 6 electrons (three lone pairs) around it. The two hydrogen atoms each have 2 electrons (one bond pair). All atoms are now complete, and the Lewis structure is ready.
Quick Reference
Quick Reference
- Immediate action item with clear benefit: Start by identifying valence electrons for each atom.
- Essential tip with step-by-step guidance: Place the more electronegative atom in the center and distribute valence electrons systematically.
- Common mistake to avoid with solution: Don’t forget to place lone pairs around the central atom to complete its octet.
How to Accurately Draw H2O’s Lewis Structure
Following the basic steps is only part of the journey. Let’s explore a more in-depth tutorial for drawing H2O’s Lewis structure to ensure precision and understanding.
Detailed Steps to Draw H2O’s Lewis Structure
Here’s a detailed how-to guide that covers every aspect:
1. Determine the Total Number of Valence Electrons
To begin, we need to count the total number of valence electrons:
- Oxygen contributes 6 valence electrons.
- Each hydrogen contributes 1 valence electron.
- Therefore, the total valence electrons = 6 (O) + 1 (H1) + 1 (H2) = 8 electrons.
2. Place the Central Atom
Oxygen is more electronegative and should be placed in the center:
- O
- H
- H
3. Connect Outer Atoms to the Central Atom
Place hydrogen atoms single-bonded to the oxygen atom. This accounts for 2 electrons per bond:
- O – H
- H
4. Complete the Octet of the Central Atom
Distribute the remaining electrons to the central atom to satisfy the octet rule:
- Place three lone pairs around the oxygen atom.
- This uses up 6 electrons.
5. Check the Octet Rule for Outer Atoms
Ensure each outer atom has a complete octet. Hydrogen needs only 2 electrons, which it already has:
- Each hydrogen atom has two electrons (one bond pair).
Practical Example
Let’s put this into practice by drawing:
Start with the central oxygen atom. Place hydrogen atoms on either side and draw single bonds:
- O
- H
- H
Place lone pairs on the oxygen:
- O:
- •
- •
- •
Your completed Lewis structure should look like:
- O
- H:
- H
Practical Tips and Best Practices
Here are some best practices and tips to ensure accuracy:
- Double-check valence electrons: Always ensure the total number of valence electrons is correct.
- Central atom: Always place the most electronegative atom in the center.
- Lone pairs: Don’t forget to place lone pairs around the central atom to complete its octet.
Frequently Asked Questions
Why does the Lewis structure of H2O not follow the octet rule for oxygen?
In H2O, oxygen follows the octet rule perfectly with 8 valence electrons. It forms two bonds with hydrogen atoms, using 4 electrons, and has three lone pairs, contributing another 6 electrons, totaling 8 electrons around oxygen.
What is a common mistake students make when drawing the Lewis structure of H2O?
A common mistake is to misplace lone pairs or to leave hydrogen atoms without bonds. It’s crucial to ensure each hydrogen has a bond with the oxygen atom, and oxygen has two lone pairs to satisfy the octet rule.
How do I determine which atom should be the central atom in a Lewis structure?
The central atom is typically the most electronegative atom in the molecule. For H2O, oxygen is more electronegative than hydrogen, so it is the central atom.
By following this guide, you should feel more confident in drawing and understanding the Lewis structure of H2O. Remember, practice makes perfect, so keep working on different molecules to strengthen your understanding. This process, though intricate at first glance, becomes much easier with practice and application of these steps and tips.