The roof, also known as the eaves of a house, often goes unnoticed, but it plays a crucial role in your home’s overall integrity and aesthetics. Proper eaves maintenance is essential to prevent water damage, ensure energy efficiency, and preserve the home’s beauty. If you’ve noticed sagging eaves, water pooling, or other issues, understanding how to address them can save you from costly repairs and a range of inconveniences. Let’s delve into practical steps and advice to help you care for your home’s eaves effectively.
Understanding the Roof Eaves
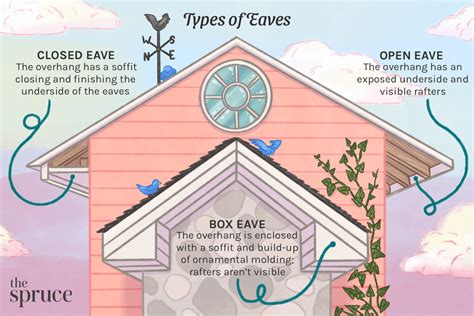
The eaves are the lower edges of a roof that overhang the walls of a building. This part of the roof serves as the first line of defense against rain and snow. It helps to direct water away from the walls and into the gutters. Maintaining your eaves ensures that your home remains dry and prevents long-term structural damage.
The Problem: Neglected Roof Eaves
Neglected eaves can lead to a host of problems. When the eaves are damaged or not properly maintained, water can penetrate the walls, leading to mold growth, wood rot, and other structural issues. Over time, this neglect can result in a domino effect of repairs that costs more than just addressing the eaves alone. This guide will help you spot early signs of eaves neglect, provide actionable steps to fix these issues, and offer tips to prevent them from recurring.
Quick Reference
Quick Reference
- Immediate action item: Check for loose or damaged shingles and replace them.
- Essential tip: Clean out gutters at least twice a year to prevent water pooling.
- Common mistake to avoid: Overlooking the underlayment which can lead to water seepage.
Step-by-Step Guide to Fixing Roof Eaves
Here’s a comprehensive guide to addressing and maintaining your home’s eaves. This guide will walk you through each step to ensure that your eaves remain functional and durable.
Step 1: Inspect Your Eaves
Before you start any repair work, it’s important to thoroughly inspect your eaves for damage. Look for:
- Missing or broken shingles
- Water stains on the walls
- Debris buildup in the gutters
- Loose or sagging eaves
Take note of any areas that require attention. If you notice any significant damage, consider hiring a professional for assessment.
Step 2: Clean Your Gutters
Gutters act as channels for rainwater, directing it away from the house. Over time, leaves, twigs, and other debris can accumulate in the gutters. This not only obstructs the flow of water but can also cause pooling and damage the eaves.
Here’s how to clean your gutters:
- Turn off any downspouts to prevent the debris from being pushed back up.
- Use a gutter scoop to remove larger debris.
- For stubborn debris, use a leaf blower or a mixture of water and vinegar to loosen it.
- Make sure the gutters are free-flowing and clear of any obstructions.
If you have vinyl gutters, you can also use a garden hose with a soft nozzle to clear out debris.
Step 3: Repair Damaged Shingles
Missing or damaged shingles can let water seep through and cause significant damage to the roof structure. Here’s how to repair them:
- Identify the damaged shingle. Carefully remove the nails or clips holding the shingle in place.
- Inspect the area under the damaged shingle to ensure there’s no underlying moisture issue.
- If the underlying layer (underlayment) is intact, use roofing cement to seal any small gaps.
- Replace the shingle by positioning it in the correct location, ensuring it overlaps correctly with the shingles below.
- Nail or clip the shingle back into place. Use roofing nails or clips designed for the type of shingle you have.
Step 4: Check and Repair the Underlayment
The underlayment is a protective layer between the roof deck and the shingles. It’s crucial for water resistance. Inspect it for tears, punctures, or mold. If it’s damaged, you may need to replace it.
- Remove the affected shingles to access the underlayment.
- Cut out the damaged section carefully to avoid damaging surrounding areas.
- Measure and cut a new piece of underlayment to fit the hole.
- Staple or nail the new underlayment in place.
- Replace the shingles over the new underlayment.
Step 5: Seal Gaps and Joints
Seal any gaps or joints around the eaves to prevent water infiltration. Use caulk or roofing sealant to fill in these areas.
- Clean the area around the gap or joint to remove any dirt or debris.
- Apply a continuous bead of caulk or sealant, ensuring it covers the entire gap.
- Smooth the sealant with a caulk smoother or a wet finger to ensure an even application.
Step 6: Enhance Roof Drainage
Proper drainage is essential for preventing water accumulation around the eaves. Ensure your roof has effective drainage solutions in place.
- Check for proper pitch in the roof to ensure water runs off efficiently.
- Ensure the eaves extend sufficiently beyond the walls to direct water away.
- Install or check the functionality of roof rakes if not already in place. These are installed at the edge of the roof and help keep debris from blocking the gutters.
- Regularly clean the downspouts and ensure they direct water away from the foundation.
Preventative Maintenance Tips
To keep your eaves in good condition, follow these preventative measures:
- Perform a seasonal roof inspection to catch any minor issues before they become major problems.
- Regularly clean gutters and downspouts in the spring and fall.
- Trim nearby trees and shrubs to reduce the amount of debris that can fall on your roof.
- Inspect your roof after a severe weather event to identify any damage.
Practical FAQ
How often should I clean my gutters?
It’s recommended to clean your gutters at least twice a year – once in the spring and once in the fall. During heavy storm seasons, check more frequently to ensure they remain clear of debris.
Can I repair the underlayment myself?
Yes, you can repair the underlayment yourself if the damage is minor. However, if the area is large or if you’re unsure about the process, it’s best to consult a professional to avoid further damage.
What type of caulk should I use for sealing eaves?
For sealing around eaves and roof joints, use a high-quality, weather-resistant caulk specifically designed for roofing. This type of caulk is resistant to UV rays and temperature fluctuations, ensuring longevity and effective sealing.
By following this guide and staying vigilant with regular maintenance, you can keep your home’s eaves in optimal condition, preventing water damage, and ensuring the longevity of your roof and home.