Mastering the 270 Counterclockwise Rotation Rule
Understanding the Challenge
When working with 2D geometry, a common task is understanding and applying rotation rules to shapes. The 270 counterclockwise rotation, in particular, can be perplexing for many users due to its complexity and the potential for errors. This guide aims to demystify this rule by providing you with step-by-step guidance, real-world examples, and practical solutions to help you master the 270 counterclockwise rotation effectively. Whether you’re dealing with computer graphics, game development, or just a math problem, this guide will help you navigate and apply this rotation rule confidently.
The primary goal is to equip you with the knowledge to accurately rotate shapes and points by 270 degrees counterclockwise without getting lost in the intricacies. You'll learn how to approach this task systematically, avoiding common pitfalls and ensuring precise results.
Quick Reference
Quick Reference
- Immediate action item with clear benefit: Start by identifying the center of rotation for your shape or point. This will be your reference point as you apply the 270 counterclockwise rotation.
- Essential tip with step-by-step guidance: Break the rotation down into smaller, manageable steps. First, rotate 90 degrees clockwise, then another 90 degrees, and finally another 90 degrees. This simplifies the process.
- Common mistake to avoid with solution: One frequent error is to rotate around the wrong center point. Always ensure the object is properly aligned with the chosen center of rotation before applying any rotation. Double-check this alignment each step of the way.
Detailed How-To Section: Step-by-Step 270 Counterclockwise Rotation
To rotate a shape or point by 270 degrees counterclockwise, follow these detailed steps:
Step 1: Identify the Center of Rotation
The center of rotation is the fixed point around which all other points of the shape or graph rotate. It’s essential to pinpoint this accurately. For a shape, it might be the centroid, while for a point (x, y), it is often the origin (0, 0) unless otherwise specified.
Step 2: Understanding the Concept
When rotating a point (x, y) by 270 degrees counterclockwise, remember this is equivalent to rotating it by 90 degrees clockwise three times. Instead of directly doing a complex 270-degree rotation, break it into simpler segments:
- First, rotate by 90 degrees clockwise.
- Then, rotate the resulting point by another 90 degrees clockwise.
- Finally, rotate the new point by another 90 degrees clockwise.
Step 3: Apply the Rotation in Steps
Let’s take a point (x, y) and apply the 270 counterclockwise rotation step-by-step.
Step 3a: Rotate 90 Degrees Clockwise
First, rotate the point (x, y) 90 degrees clockwise around the center of rotation. To do this, use the transformation formula:
New coordinates: (-y, x)
Step 3b: Rotate 90 Degrees Clockwise Again
Next, take the new coordinates from Step 3a and rotate them another 90 degrees clockwise around the center of rotation. Using the same transformation formula:
New coordinates: (x, -y)
Step 3c: Rotate 90 Degrees Clockwise Once More
Finally, rotate the coordinates from Step 3b another 90 degrees clockwise around the center of rotation:
New coordinates: (-y, -x)
Step 4: Confirm the Result
To ensure accuracy, double-check the final coordinates to verify that the 270-degree counterclockwise rotation has been applied correctly.
Practical Example: Rotating a Triangle
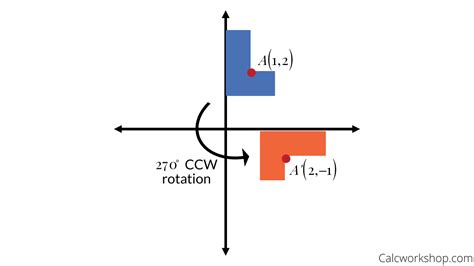
Let’s apply the 270 counterclockwise rotation rule to a triangle with vertices A(1, 2), B(3, 4), and C(2, 1).
Assume we rotate this triangle around the origin (0, 0).
Step-by-Step Application
Step 3a: Rotate Each Vertex by 90 Degrees Clockwise
- Vertex A (1, 2): New coordinates (-2, 1)
- Vertex B (3, 4): New coordinates (-4, 3)
- Vertex C (2, 1): New coordinates (-1, 2)
Step 3b: Rotate Each Resulting Point by 90 Degrees Clockwise
- Vertex A (-2, 1): New coordinates (1, 2)
- Vertex B (-4, 3): New coordinates (3, 4)
- Vertex C (-1, 2): New coordinates (2, 1)
Step 3c: Rotate Each New Point by 90 Degrees Clockwise
- Vertex A (1, 2): New coordinates (-2, -1)
- Vertex B (3, 4): New coordinates (-4, -3)
- Vertex C (2, 1): New coordinates (-1, -2)
Verify the Results
After performing these steps, we’ve successfully rotated the triangle by 270 degrees counterclockwise around the origin.
Practical FAQ
What if the center of rotation isn’t the origin?
If the center of rotation is not at the origin, you’ll need to adjust your approach. First, translate the shape so the center of rotation moves to the origin. Apply the rotation steps on the translated shape. Finally, translate it back to the original position. Here’s how to do it:
- Identify the center of rotation, say (h, k).
- Translate the shape so (h, k) moves to (0, 0). For any point (x, y), the translated point will be (x-h, y-k).
- Perform the 270 counterclockwise rotation on the translated point.
- Finally, translate the rotated point back by moving (x, y) to (x+h, y+k).
Another Common Question: How can I verify my rotation is correct?
To verify the accuracy of your rotation, you can:
- Use a graphing tool to plot the original and rotated shapes and compare them.
- Check the distances between corresponding points to ensure they remain consistent.
- For simpler verification, check that your shape is rotated by 270 degrees; you can do this by confirming the coordinates follow the pattern we discussed.
This comprehensive guide should help you grasp and implement the 270 counterclockwise rotation rule accurately and confidently, minimizing common errors and optimizing your understanding. By following the steps methodically, you’ll ensure precise and reliable rotations for any shape or point.