Mastering 1 Point Perspective: Pro Techniques
Artists of all levels often find themselves drawn to the challenge and beauty of perspective drawing. Among the different types of perspectives, 1 point perspective offers a simplified yet powerful way to depict depth and realism in your artwork. Whether you're an aspiring artist or a seasoned creator looking to refine your skills, understanding and mastering 1 point perspective can transform the way you visualize and execute your projects. This guide will provide you with the step-by-step guidance and actionable advice you need to elevate your perspective drawing to a professional level.
Problem-Solution Opening Addressing User Needs
Many artists struggle with the initial stages of learning perspective drawing. It’s often overwhelming to understand the rules and to apply them in a way that looks natural and realistic. One of the most common challenges is grasping the concept of one-point perspective where the vanishing point appears on the horizon line. While the theory behind it is simple, practically applying it to create convincing, 3D-like images can be daunting. This guide aims to demystify the process and provide clear, practical solutions that will help you unlock the full potential of your perspective drawings.
Quick Reference
Quick Reference
- Immediate action item: Start with a horizon line and a single vanishing point on this line. This will guide all the diagonal lines that recede into the distance.
- Essential tip: Use horizontal guidelines to maintain perspective accuracy. Place these guidelines wherever you need to add parallel lines that converge at the vanishing point.
- Common mistake to avoid: Forgetting to use the horizon line as a reference. All diagonal lines should meet at this point for accurate perspective.
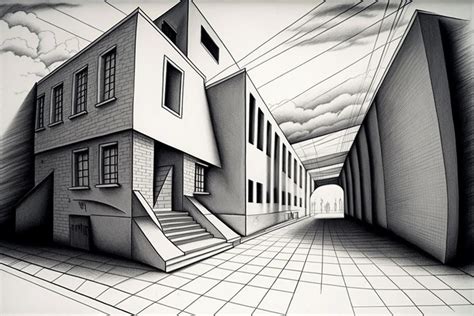
Understanding One-Point Perspective
One-point perspective is the simplest form of linear perspective. It creates the illusion of depth and distance by having all parallel lines in a scene converge at a single point on the horizon line.
Key Concepts
Here are the key elements of one-point perspective:
- Horizon Line: An imaginary line that represents the viewer’s eye level. It sits flat across the middle of your drawing space.
- Vanishing Point: The single point on the horizon line where all the parallel lines seem to converge. This point can be positioned anywhere on the horizon line.
- Diagonal Lines: These are the lines that recede towards the vanishing point. They can be vertical, horizontal, or slanted and will converge at the vanishing point.
Understanding these basic components is critical for mastering one-point perspective.
Step-by-Step Guide to Drawing with One-Point Perspective
Let’s walk through the steps to create a simple one-point perspective drawing.
Step 1: Setting Up Your Grid
Begin by drawing a horizon line and a single vanishing point. For a basic city scape or a building, start with a simple grid on your paper.
Step-by-Step Process:
- Draw a horizontal line near the center of your paper to represent the horizon line.
- Mark a point on this line to represent the vanishing point. This could be on the left, right, or centered, depending on your scene.
- Draw vertical lines from the top and bottom of your paper to the vanishing point. This grid will serve as the foundation for placing your perspective elements.
Step 2: Establishing Vertical Lines
For a building or a structure, start by drawing vertical lines from the top and bottom of your grid.
Step-by-Step Process:
- Draw vertical lines starting from the base of your building and extend them up to the top. Ensure that these lines meet the vanishing point.
- If your building has additional floors or features, repeat this step for each level.
Step 3: Adding Horizontal Guidelines
To add depth and structure, you'll now use horizontal guidelines.
Step-by-Step Process:
- Draw horizontal lines intersecting your vertical lines at different levels, converging at the vanishing point. These guidelines represent the floor and ceiling of each level in your building.
- Make sure these horizontal lines are parallel and meet at the vanishing point.
Step 4: Drawing Detail and Elements
With your structure laid out, add details like windows, doors, and other architectural features.
Step-by-Step Process:
- Use your vertical and horizontal guidelines to place the windows and doors accurately. Ensure that the top edges of windows are on the same horizontal line and that the sides align with the vertical lines.
- Add any additional features like balconies, ledges, or railings, making sure they follow the perspective rules.
At this stage, your one-point perspective drawing should start to look like a three-dimensional structure.
Step 5: Adding Shading and Texture
To make your drawing look more realistic, add shading and textures.
Step-by-Step Process:
- Identify the light source and shade accordingly. Areas facing away from the light should be darker, while those directly facing it should be lighter.
- Add texture to different parts of the building, like bricks, wood panels, or glass, using hatching or cross-hatching techniques.
Your final drawing should now appear three-dimensional, capturing depth and realism effectively.
Practical FAQ
How do I choose the vanishing point?
Choosing the vanishing point depends on the perspective you want to achieve. Typically, for a street scene, the vanishing point is placed at the center where the road seems to converge. For buildings, it can be on the side where the wall meets the sidewalk. The key is to position it where it makes the most sense for the scene you’re depicting and where the viewer’s eye naturally leads.
What tools should I use for precise perspective drawing?
While you can draw with a pencil and eraser for flexibility, using a set of drawing tools can make the process easier and more precise. A mechanical pencil with fine tips can help with drawing fine lines, while an erasable ink pen can be used for outlining once you’re satisfied with your pencil sketch. Drawing squares, triangles, or grids can help maintain accuracy, especially when starting with more complex compositions.
Can I use one-point perspective in other types of art like comics or animations?
Absolutely! One-point perspective is incredibly versatile and can be applied to various art forms including comics and animations. In these mediums, it can help create dynamic scenes and convey depth effectively. For instance, a comic panel can use one-point perspective to show a character walking down a street or through a door, adding depth and realism that enhances storytelling.
By following this guide, you will have a solid foundation for mastering one-point perspective. Remember, practice is key. The more you draw using perspective rules, the more intuitive the process will become, and the more dynamic and realistic your artwork will appear. Happy drawing!